Tuesday, November 26, 2013

How to Create a Report to be Printed on Another Computer or Printer


How to Create a Report to be Printed on Another Computer or Printer

To create a file out of a report to print on another computer or printer, save the report as a PDF.

On the Mac OSX operating system you can do that that by clicking print and choosing the Save as PDF option. 


On Windows, 

if you do not have a PDF Conversion Program, try a free PDF software download. http://www.cutepdf.com/products/cutepdf/writer.asp

Printing Reports: Instructions


Instructions for Printing Reports. 

1. To show all records in the report click the "Show All Records" button.


2. Next, go to the Reports Tab to view and select a report. 


3. Click the Run Report button next to the report.


4. Select the options and customization if applicable for the specific report. 

5. When asked choose All to print all records in your collection. 


What is the Tracking Number and How is it Used?


The tracking number is for your own use, to be used as a numbering system.

It defaults by placing a random unique number in that field upon record creation.  However, you can type into the field and manually override the default number as you wish. 

If you are choosing to override with a sequential number, that is fine. If you choose to change a number and wish to update all records at once you can do that but not with a prefix such as, for example, "NYC", only with a sequential number. Please see the instructions below. 

Renumber all record's tracking number sequentially, automatically.

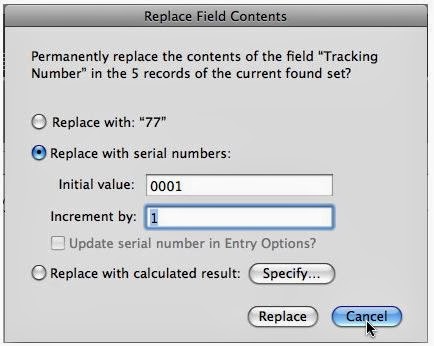
At the end of the inventory you can renumber all records sequentially, automatically, by putting your curser in the Tracking # of the FIRST record and going to Records/Replace Field Contents in the upper menu bar. Remember to hit the Show All Records button or go to Records/Show All Records to make sure all records are currently displayed. 


When the dialog pops up, choose the "Replace with serial numbers:" option, make your choice of how long your number will be and click Replace. This will serialize all records in your art list at once automatically. If you add new records later just insert manually at the next sequential serial number. 


Friday, November 22, 2013

Opening Files from Another Version of My Art Collection

Opening Files from Another Version of My Art Collection

A file from the Professional Version can't be opened directly by an Advanced or Standard Version and vise versa. You need to use the File / Import a Copy of My Art Collection 2.0 to see advanced data on the Professional Version, for example. So, on the Pro if you don't want to import the data into your default file you need to create a new collection by going to File / New and then importing the Advanced data to that new file. 

To deploy data from a Pro to Adv move the data file to the computer with the Adv and use the File / Import from MAC 2.0 to import the data. 

Saturday, November 9, 2013

How to Create a Report from Existing Records.

How to generate selected artwork's report for print and mail purposes.
How to customize the report in terms of view and details.

Use the Check Box feature on the Art List to check off the records on which you want to report if it isn't something simple like all records from one Artist. Before you report on them, isolate those records first with a Find command. The easiest way to do that is to hold Control + Click (Mac), Right Click (Win) on the check and you will get a dialog box. Choose "Find Matching Records" and just the check record will be shown.


Once you have the check records isolated then run the report and choose Current when asked. This will give you the report you wish.


If you would like to email the report, use the Save to PDF feature in OSX to save and send the report as a PDF.